

Web installer preview
The web installer is a four-step wizard served from your own machine. It needs a Cloudflare OAuth application that you register and own. Dee Wan 1.0 does not ship one, so the web installer is not a supported way to install Dee Wan. Install with the command-line installer in Installing Dee Wan.
Without an OAuth application you can still walk through the wizard with
npm run install:web:dry-run, which touches nothing. See
Preview the wizard without touching Cloudflare.
How it differs from the command-line installer
Section titled “How it differs from the command-line installer”Both use the same installer engine, configuration file (backend/wrangler.jsonc) and step ledger.
| Web installer | Command-line installer | |
|---|---|---|
| Start with | npm run install:web |
npm run setup or npm run install:cms -- <verb> |
| Interface | A browser page on 127.0.0.1, served from your machine |
Terminal prompts, or no prompts with --yes |
| Cloudflare credential | Cloudflare sign-in (OAuth), held in memory for the session | An API token you create, from the environment, .env or the prompt |
| Needs | A Cloudflare OAuth application (DEEWAN_CF_OAUTH_CLIENT_ID) |
A Cloudflare API token with the listed permissions |
| Rate-limit rules | Not installed (the sign-in asks for no WAF access) | Installed when the token has Zone · Zone WAF · Edit |
| Planning and scripting | Shows what will be created before you install | plan, --json output and fixed exit codes |
| Resume after a stop | Resume button | npm run install:cms -- resume, or run setup again |
The installer reads the OAuth client id from DEEWAN_CF_OAUTH_CLIENT_ID. Without it, the Cloudflare
step shows “Cloudflare sign-in needs setup.” and tells you to use the command-line installer.
Start it
Section titled “Start it”npm run install:webThe server listens on 127.0.0.1 only, on port 8976 unless DEEWAN_INSTALL_PORT is set. It
prints one link:
Dee Wan installerOpen this link. It is bound to this session and is not written to disk:
  http://127.0.0.1:8976/?t=<session-token>
The token in the link is generated for this run. Every request must carry it, so another page or program on the same machine cannot drive the installer. A request without it gets “This installer is bound to one session. Open the link printed in the terminal.” Press Ctrl-C in the terminal when you are done.
Cloudflare sends the browser back to http://127.0.0.1:<port>/oauth/cloudflare after sign-in, and
that address must match the one registered with the OAuth application exactly.
DEEWAN_CF_OAUTH_REDIRECT overrides it.
The page has a Language selector with English, Thai, Russian, Spanish, French and German. The language you install in also becomes the default language of the first site.
The wizard has four steps: Site, Cloudflare, Administrator and Install. Continue saves the current step before moving on, and Back returns to the previous one.
Step 1: Site
Section titled “Step 1: Site”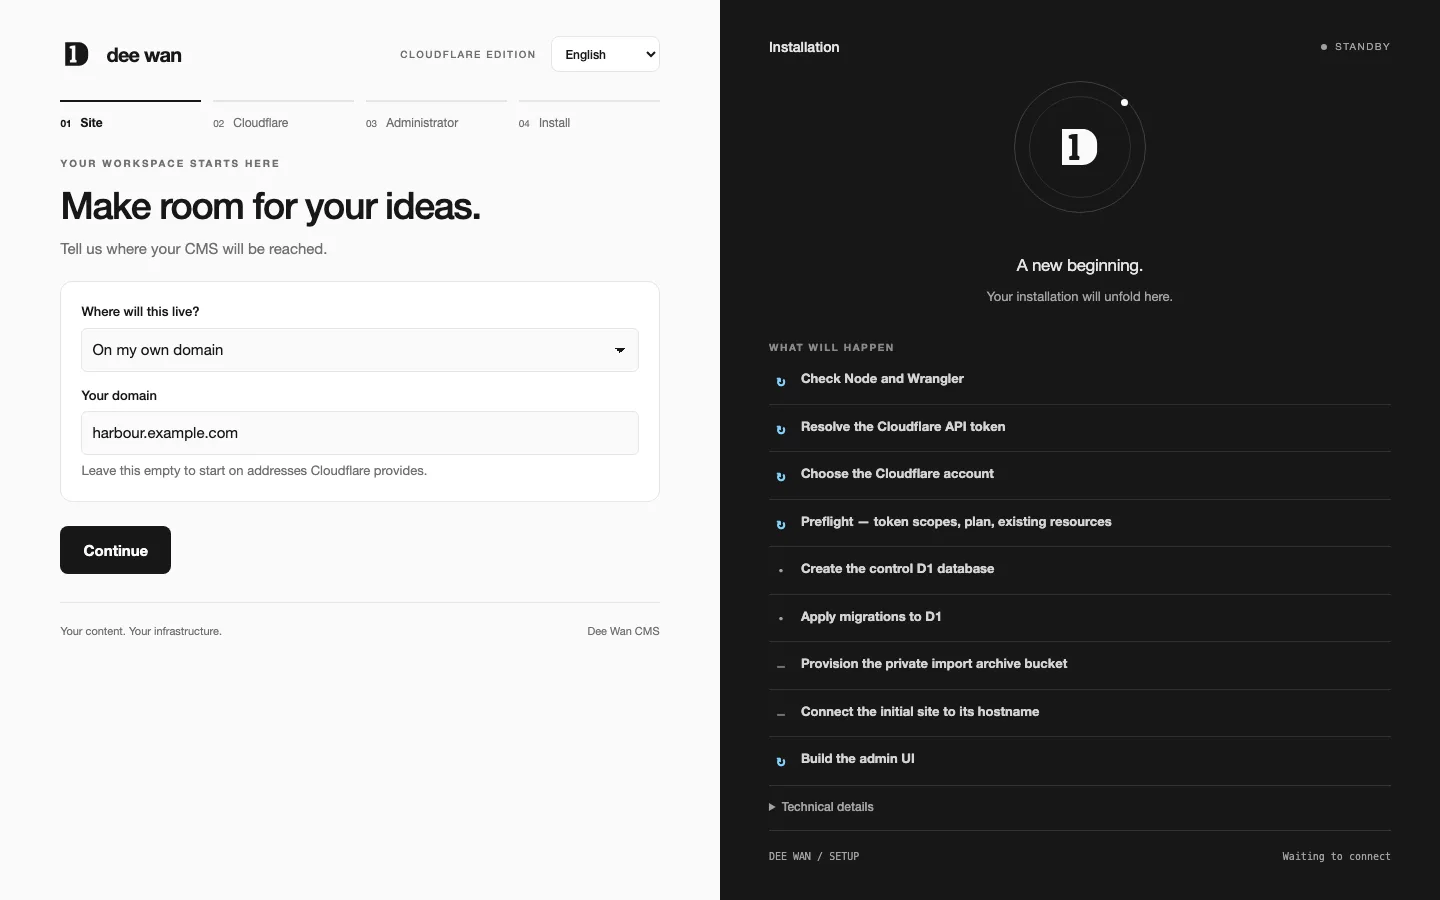
Where will this live? has two answers:
- On my own domain: enter it in Your domain, for example
example.com. - On addresses Cloudflare provides: leave the domain empty.
Nothing else is asked here. Infrastructure names and optional features have working defaults and are on the Install step.
Step 2: Cloudflare
Section titled “Step 2: Cloudflare”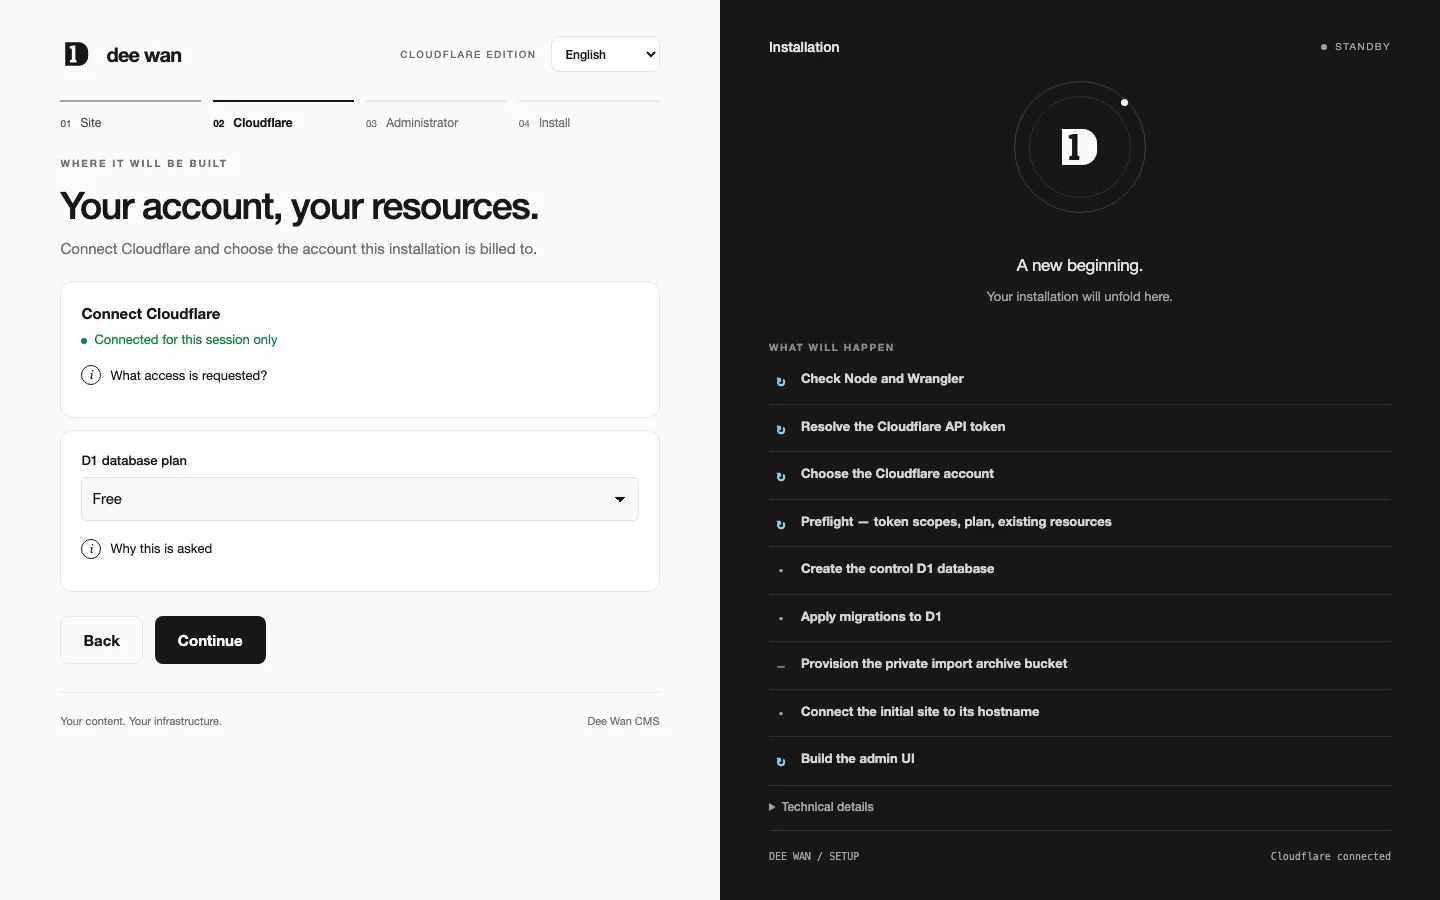
- Under Connect Cloudflare, choose Authorise Cloudflare. It opens Cloudflare in a new tab. The link is disabled while you have unsaved changes (“Save your settings before connecting.”).
- Approve the request. The tab then shows Connected and says the installer holds a Cloudflare credential for this session only. Close it and return to the installer, where the card shows Connected for this session only.
- Choose the account under Which Cloudflare account and select Use this account. If your sign-in reaches only one account, it is chosen for you. Everything the installation creates is billed to this account.
- Choose the D1 database plan: Free or Paid. Cloudflare publishes no way to read which plan an account is on, and the two plans allow different amounts of stored content, so the installer asks instead of guessing.
What access is requested? lists the exact Cloudflare scopes the sign-in asks for. They depend on your answers:
| When | Scopes |
|---|---|
| Always | account-settings.read, d1.write, workers-scripts.write, page.write, workers-r2.write |
| With your own domain | zone.read, workers-routes.write |
| With your own domain and DNS setup on | dns.write |
| With Cloudflare Access on | access.write, access-acct.read |
No WAF scope is ever requested. See the visitor limit under Step 4.
If you later change a setting that changes the access needed, the installer drops the old authorization and says “Saved. This changes what access is needed, so connect Cloudflare again.”
You cannot continue until Cloudflare is connected and an account is chosen.
The credential is held in the installer’s memory, not written to disk. If it expires, the page says “Your connection expired. Connect again to continue.” Authorising again does not affect anything already created.
Step 3: Administrator
Section titled “Step 3: Administrator”Enter one Administrator email. The first sign-in link (the claim link) is bound to this address, and only this address can claim the installation.
Step 4: Install
Section titled “Step 4: Install”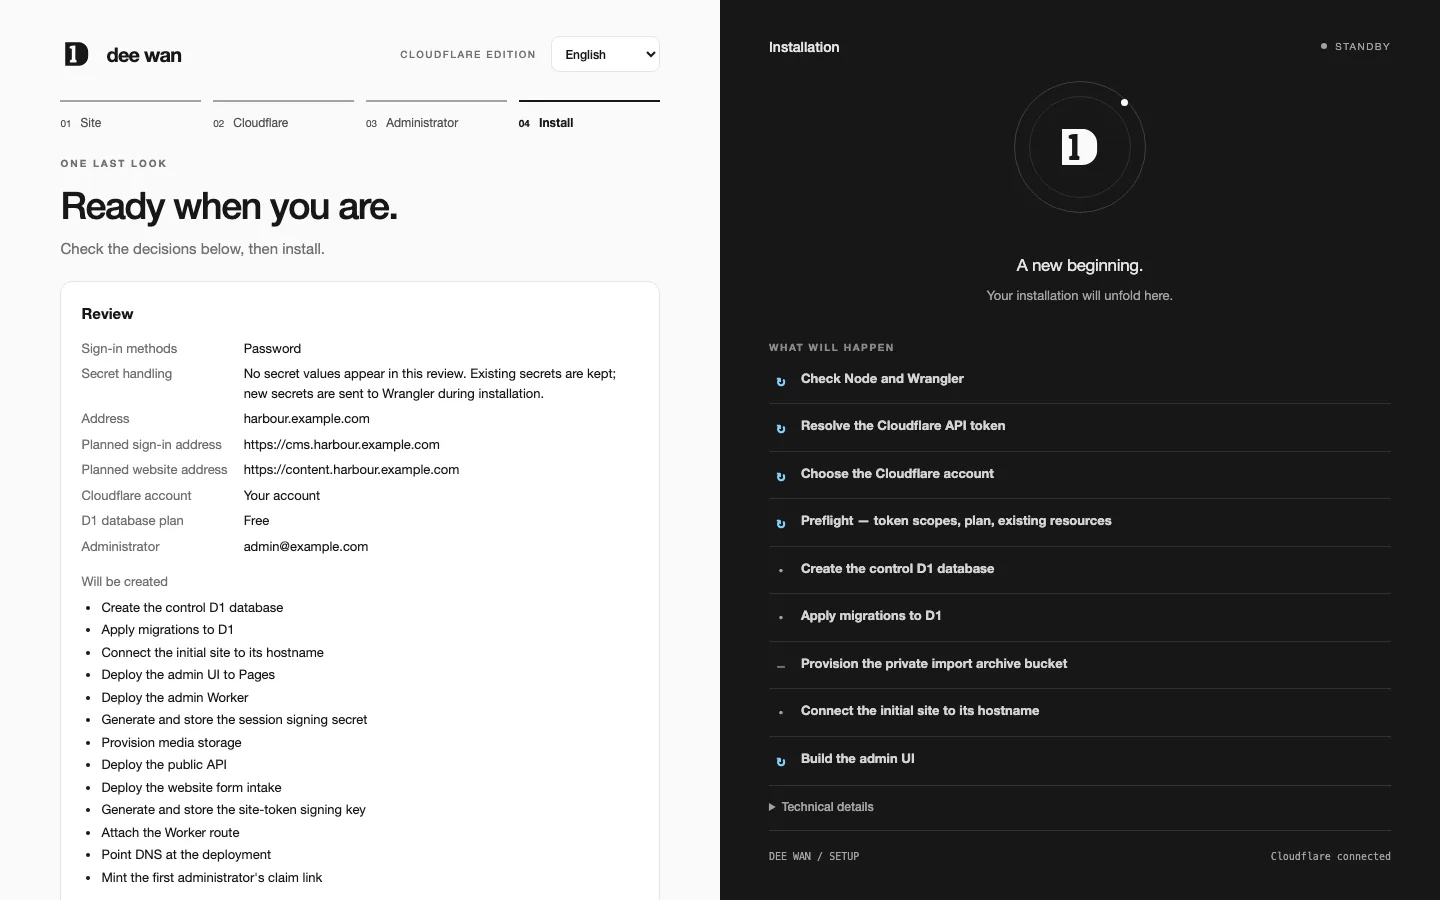
Review lists what you decided: the address, the Planned sign-in address, the Planned website address, the Cloudflare account, the D1 database plan and the administrator. Will be created lists every step that will create something and has not been done yet.
Customize infrastructure opens the remaining settings:
| Setting | Default |
|---|---|
| Where you sign in (admin subdomain) | cms |
| Where your website reads from (public API subdomain) | content |
| Point your domain at this installation | On. Needs your own domain. |
| Ask for a Cloudflare sign-in before the admin (Cloudflare Access) | Off. Needs your own domain. |
| Limit how often one visitor can read your content | Off. Needs your own domain. See the note below. |
| Service name (admin Worker) | dee-wan-cms-backend |
| Project name (Pages project) | dee-wan-cms |
| Your workers.dev subdomain | Empty. Used for the public API address when you have no domain. |
| Seconds to keep website answers | 0, which shows every reader the newest content |
| Also prepare the archive bucket for importing from another system | Off |
The admin and the website need different subdomains. If you turn on Access, note the two warnings the page shows: every person you invite also needs an entry in the Cloudflare Access policy, and if the Access application is deleted or misconfigured, everyone is locked out. With Access on, a site administrator can map an email domain or an Access group to a role instead of inviting each person. Someone Access lets in with that domain or group then gets an account on first sign-in. See People and access.
The web installer does not install the visitor limit. The setting is saved
(SETUP_PUBLIC_RATE_LIMIT in backend/wrangler.jsonc), but the rule is a Cloudflare WAF
rate-limiting rule and the web installer’s sign-in has no WAF access. The run reports that the rule
could not be installed and continues. The same happens to the sign-in rate-limit rule. To install
them, run npm run setup afterwards with an API token that includes Zone · Zone WAF · Edit (see
Credentials). When the rule is installed, it also limits private
reads, including a site build that reads from one IP address.
The review also says that error reports go to the Dee Wan Sentry project when the deployment has its
address, built in or set as the DEEWAN_SENTRY_DSN secret, and that without one nothing is sent. In
this build no Dee Wan Sentry address is built in, so nothing is sent to Dee Wan unless
DEEWAN_SENTRY_DSN is set. Until then, Installation → Error reports says “No Dee Wan
destination in this build. Nothing is sent.” Reports never include content, form values, emails or
credentials. To send them to your own Sentry project, set the OPERATOR_SENTRY_DSN secret. Secrets
belong to one Worker: set either address on the public read Worker too
(npx wrangler secret put <NAME> --config wrangler.public.jsonc) for its errors to be reported. See
Secrets.
If you edit a setting on this step, the primary button becomes Save changes. Once everything is saved, choose Install.
The installer refuses to start a run against settings you have not reviewed. If the configuration file changed while the page was open, it says “The settings changed while this was open. Nothing was started. Review them and try again.”
What the web installer writes
Section titled “What the web installer writes”Each save writes your answers into backend/wrangler.jsonc (or the file named with --config)
and keeps any comments in it. If the file does not exist, a fresh one is created. Choosing an
account writes account_id. The file is gitignored because it holds your real values. The web
installer cannot edit a wrangler.toml configuration. Convert it to wrangler.jsonc or use the
command-line installer.
The install run itself is the command-line engine: the page starts install:cms apply (or
resume) with --yes, passing the Cloudflare credential from your sign-in. It does everything
npm run setup does that the sign-in’s access allows, including writing
backend/wrangler.public.jsonc for the public read Worker and backend/wrangler.intake.jsonc for
the form intake Worker.
Following the run, retrying and resuming
Section titled “Following the run, retrying and resuming”The panel beside the wizard shows What will happen before a run, Progress during it, and What was done when it finishes. Technical details shows the installer’s log, with credentials removed.
The page keeps polling while a run is going. If you reload it, it returns to the run. If it loses contact with the installer, it says “Lost contact with the installer. It may still be running — reload this page.”
If a run stops, the panel says where (“Stopped at: …”) and what to do next:
- If some steps were completed: “Your progress is saved. Resume when you are ready.” Choose Resume. Completed steps are not repeated.
- If nothing was created: “Nothing was created. Install again when you are ready.” Choose Install.
A run that ends with unfinished work (exit code 4, incomplete) is reported as “Not finished” and not as a success. Check the log, fix what it names, and resume.
When it finishes
Section titled “When it finishes”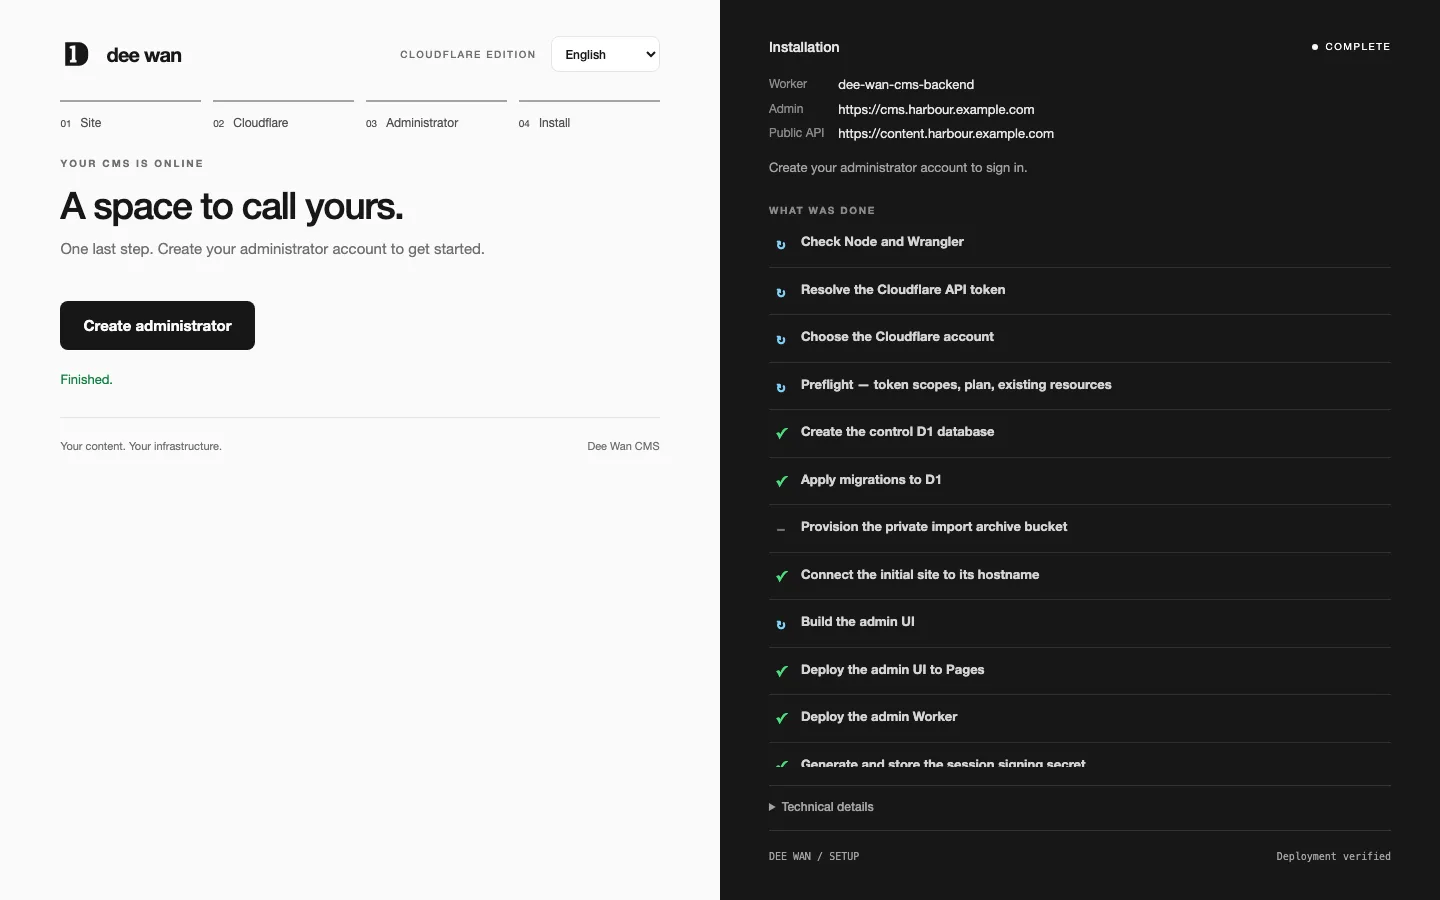
The panel lists the Worker, the admin address and the public API address that answered, and the page shows Create administrator. It opens the claim link in a new tab, where you choose any configured sign-in method. See Claim the installation.
The claim link is never shown in the log. The page offers it through that button, only while the link is valid, and only once. If it expires before anyone uses it, choose Resume to mint a new one while the installation is unclaimed.
Preview the wizard without touching Cloudflare
Section titled “Preview the wizard without touching Cloudflare”npm run install:web:dry-runThis serves the same page for review, with every external effect replaced. The configuration and
ledger live in a temporary folder that is removed on Ctrl-C. Account discovery and the install run
are simulated, and nothing reaches Cloudflare. It listens on port 8978 unless DEEWAN_INSTALL_PORT
is set. Sign-in completes when you open the sign-in link printed at start. Do not press
Authorise Cloudflare, which opens Cloudflare with a placeholder client id.
Troubleshooting
Section titled “Troubleshooting”The web installer says the port is in use. Another process, often a second installer, is
listening on the port. Close it, or set DEEWAN_INSTALL_PORT to a free port. Nothing was created
in any account. The OAuth application’s registered redirect address must match the new port.
The page says “This installer is bound to one session.” Open the exact link printed in the terminal. A restarted installer prints a new link.
The Cloudflare step says “Cloudflare sign-in needs setup.” DEEWAN_CF_OAUTH_CLIENT_ID is not
set. Use the command-line installer with an API token.
The web installer cannot read or edit the configuration. It edits only wrangler.jsonc. Fix
backend/wrangler.jsonc if it is malformed, or convert a wrangler.toml to wrangler.jsonc, then
reload the page.
For problems the command-line installer shares, such as DOMAIN set without DOMAIN_MODE or an
unresolved step, see Troubleshooting.
Next step
Section titled “Next step”Install with the command-line installer.
Unreleased / pre-MVP; no stable version
Source revision: fe23db481c422b40e317b92fc98116b4c0c26a87 (modified checkout)
Build date (UTC): 2026-10-18T09:22:34.630Z
Upgrade target: unavailable: modified checkout. Release notes